Friday, May 27, 2011

Strawberry Jam

It is the end of May and I must admit I almost missed strawberry season here in Southeast Tennessee! Whew! Time simply got away from me!
Fresh Tennessee Strawberries!
However, I was able to pick up one of the last flats of our local strawberries. Aren't they just gorgeous!
I love buying local!

Despite the horrific weather we have had this spring, it has been a wonderful growing season. This year's  strawberries are plump, brilliant in color, and extremely sweet! No need for any sugar on these little gems!
Little hands kept sneaking strawberries while Mommy wasn't looking!
I purchased these strawberries for jam, but after tasting how delicious they were, I could hardly bear to devote all of them to preserving. So, I used half of the flat for jam and stashed the other half in the fridge for eating! Strawberries will last 5-10 days in the fridge at 32/F.

My favorite way to preserve fruit is by freezing. This is the most efficient way to lock in all the vitamins and nutrients found only in fresh fruit. However freezing requires a lot of space. And if you are like me, excess freezer space is something you do not have. So, the next best option is canning.

For strawberry jam, you will need the following:
  • 5½ cups crushed strawberries (about 3 quart boxes strawberries)
  • 1 package powdered pectin
  • 8 cups sugar
  • 9- 10 half-pint sterilized jars with lids
  • Water bath canning equipment
  • Time needed: about 1.5 hours (including processing time)
Here are the steps:
Prepare the fruit. Sort and wash fully ripe strawberries; remove stems and caps.
Crush your berries. (I use a food processor but you can also cut the berries into small pieces or crush by hand- depending on what consistency you wish your jam to have.)


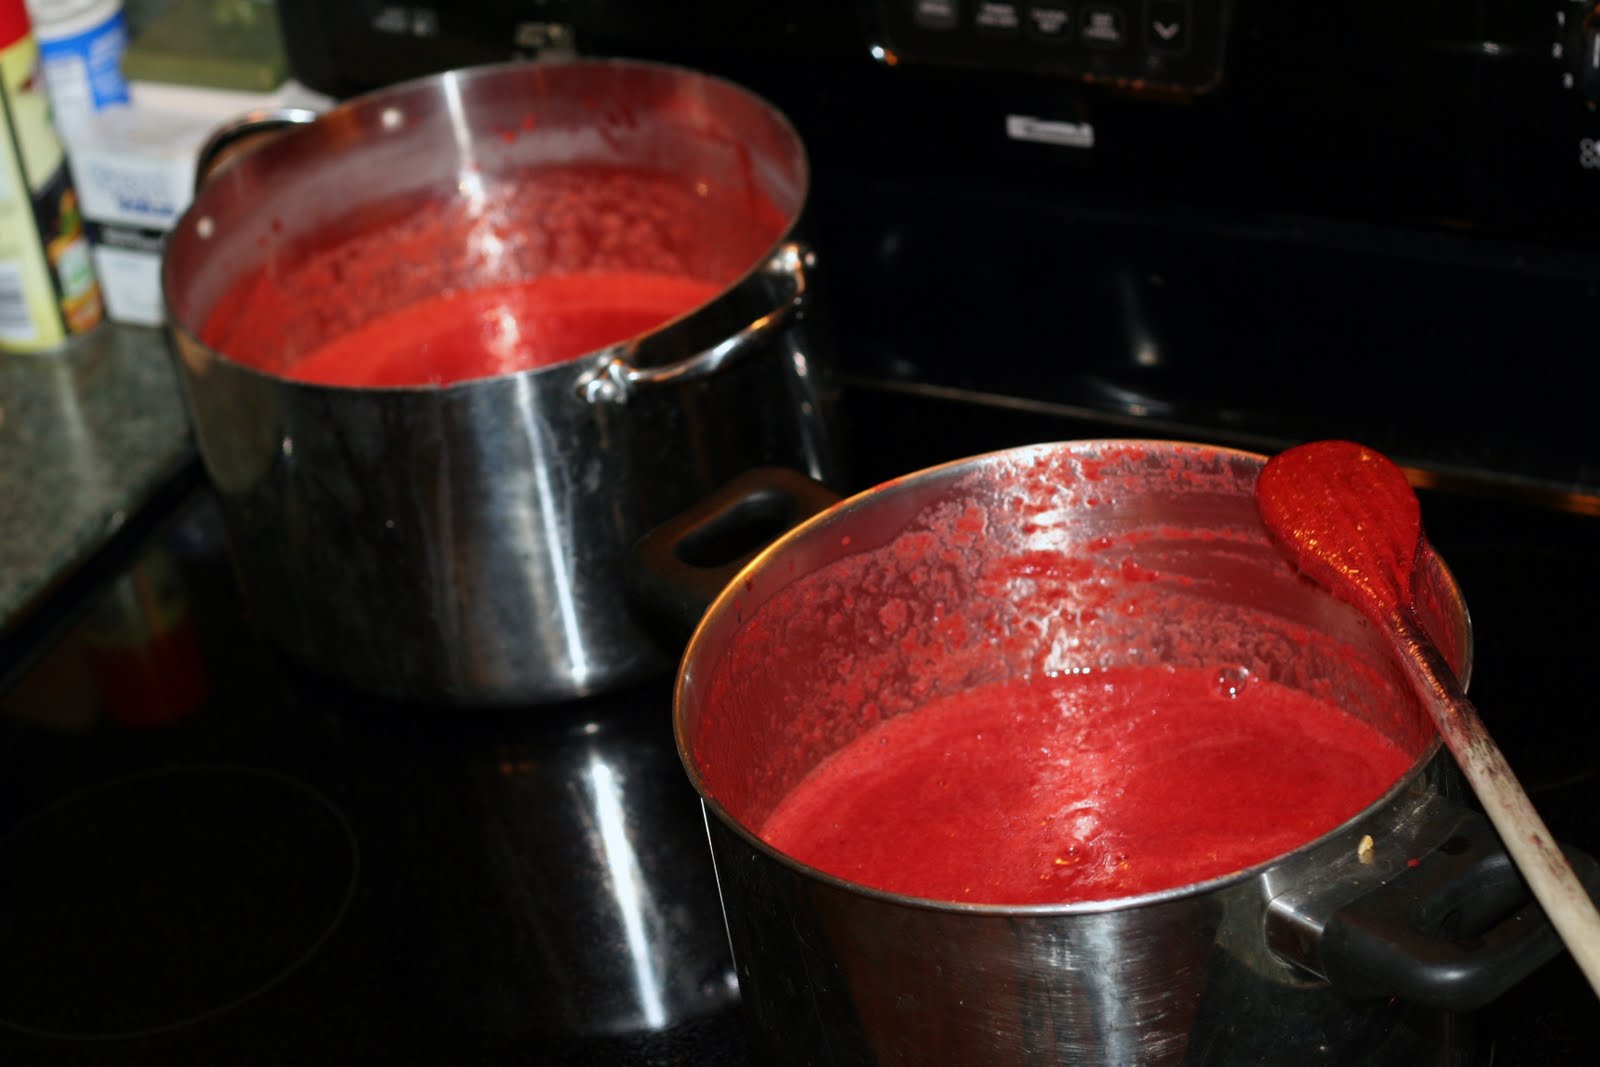
To make jam. Measure crushed strawberries into a kettle. Add pectin and stir well. Place on high heat and, stirring constantly, bring quickly to a full boil with bubbles over the entire surface. Add sugar, continue stirring, and heat again to a full bubbling boil. Boil hard for 1 minute, stirring constantly. Remove from heat; skim.
Jam before boiling point
Fill hot jam immediately into hot, sterile jars, leaving ¼ inch headspace. Wipe rims of jars with a dampened clean paper towel; adjust two-piece metal canning lids.
Process in a Boiling Water Canner for 5-8 minutes.
Hot packed jars ready for lids
And when you are done, you have some gorgeous jam to save and to share.
Strawberry tops make yummy bunny treats!
Here are some very important notes about making jam with pectin:

1. Be sure you use a large kettle for boiling your jam. Anything made with added pectin will expand! You will need about 2-3x kettle space to be safe. I made this mistake once. I used a pot that was too small and I accidentally started a kitchen fire on my range when the pectin began to expand and boiled over the rims of the pot. The sugar in the jam caught fire on the eye of the stove and immediately began to flame! Fortunately, I had a fire extinguisher in my kitchen and was able to put it out quickly.


2. NEVER leave jams unattended on the stove top. As soon as the jam hits the right temperature, the pectin will start to expand rapidly! Continual stirring will cause the pectin expand less rapidly.

3. Pay attention to the type of pectin you use. Liquid pectin is typically added last whereas powdered pectin needs to be added in the beginning.


If you have any questions about the recipes on my blog, or just want to learn more about home canning, check out my favorite source for all things food preservation!

Friday, May 6, 2011

Terror from the sky and glimmers of hope

Just over one week ago, a series of over 200 deadly tornados ripped across 300 miles of the American South. My sister is a nurse and was working on the fourth floor of the hospital in Tuscaloosa when the mile wide twister hit. She said she saw it coming out the window as she and the staff frantically worked together to secure their patients. Just moments before the storm hit, my sister made a desperate phone call to my mother saying, "There is a massive tornado headed straight for the hospital. We are looking at a direct hit. Make sure everyone knows I love them....." And the line went dead.

About ten o'clock that evening our cell phones began ringing. The signal was fading in and out and it was hard to hear. Finally, we made out the broken voices on the other end. It was our friends in Ringgold, GA saying they were OK and asked if we were OK too.

Our house had been without power since early that morning. The first tornado to hit our area damaged our end of the city, breaking power poles and shredding lines. So throughout the day and into the night, we were oblivious to what was happening around us.

It was not until the next morning when anyone fully understood the capacity of what had happened. We turned on our battery powered radio and listened to reports of the terror the storms had reaped.
Arial photo of Chattanooga tornado damage
Photo by TEMA


Aftermath of tornado in Ringgold, GA
Photo by Ashley Moore

Aftermath of Tuscaloosa tornado
Photo by Jason Clark
In just over 12 hours,  over 300 people were dead. In Tuscaloosa, Alabama there are still around 400 people missing. In our area, more than 30 people were killed.

One of those 30 people killed in our area was a 12 year old boy from the small rural town of Bridgeport, Alabama. Moved by the massive devastation across our region, a group of high school students from a neighboring community (the community where my husband teaches) made the decision to cancel their class trip and instead donate all the trip money to this young tornado victim's family to help pay for his funeral costs.

You must understand the communities in this part of Tennessee and Alabama are not considered wealthy by any means. And, many of these high school students have never traveled beyond the jurisdiction of their own community. Their destination was Tybee Island, GA and the amount they earned from various year- long school fundraisers was $2,000.00- all of which they unselfishly donated to the 12 year old tornado victim's family.

As soon as word got out about the gift, hoards of monetary donations flooded the school. As of yesterday, nearly $5,000.00 had been given by anonymous donors to help replace the funds these students gave up. In fact, even the city of Savannah, GA found out about the student's generous gift and offered the group an all expense paid trip. Now, in turn, the school is donating the extra $5,000.00 to the American Red Cross as assistance to all the tornado victims across the American South.
Tornado aftermath in Bridgeport, AL
Photo by Stephen Hargis
This story is just one example of the rainbows that can emerge from the darkest of skies. While this one act cannot bring back all the lives that were lost, it does give us remaining feelings of hope. Sometimes, it is those who have the least to give that can offer the most.

After 31 hours without electricity or phone service, I finally heard my sister's voice on the other end of the telephone line. She was exhausted, shaken, but safe. Just as the F5 twister was about to hit the hospital, it turned and ripped through the parking lot instead, leveling a strip mall next door and taking the lives of everyone inside.

Tuesday, April 26, 2011

Springtime in the South

Spring is here in Southeastern Tennessee and the signs are everywhere. We have had a substantial amount of rainfall this spring. Coupled with days consistently in the 70s, everything is blooming early this year.


Over the weekend we put in our summer garden. We usually wait until May, but with the weather being pretty consistent, we went ahead and planted our raised beds.


Last fall we brought home some baby chicks from the local feed store. Fall is not the optimum time for baby chicks as they are extremely delicate and do not handle the cold very well. But, we wanted backyard chickens and we succumbed to the lack of delayed gratification.

Thinking we might loose one or two, we brought home 4 baby chicks. They lived in our bathroom in an old rabbit cage under a heat lamp for most of the winter. When they got big enough, and I got tired of smelling them.... we moved them outside into our rabbit hutch. We set up the heat lamp and filled their house with pine chips. (You cannot use cedar chips with birds because it causes respiratory issues). And they flourished! They are nearly 7 months old now and will start laying at 9-12 months. These are laying hens, NOT meat hens.

During the day, the girls go out to a reinforced dog kennel but at night they still sleep in the rabbit house. I do not feel confident leaving them out, so each night, we go up to the pen, gather up the girls, and carry them back to their house. They have come to expect it now.

Here are some photos of the girls free ranging and enjoying what spring has to offer.
Free ranging in the backyard!
Nellie

Donna and Rheba

The girls- Rheba, Rhoda, Donna, and Nellie

Wednesday, February 23, 2011

A little bit of history...

The little town where my sister lives is nestled deep within the American South. It is a town that time seems to have left untouched. It is approximately 60 miles from any large city and far from any major interstate. The little town itself is full of gorgeously preserved antebellum homes. During the American Civil War, this little town did not see any large battles and was left untouched by the passing Federal Army. Over the years, the local historic preservation society has been able to take over a few of these homes and restore them for public view.  They are some of the most majestic pieces of pre Civil War architecture I have ever encountered.

Bluff Hall (c. 1850) as it looks today
One of the homes in this little town sits right on the river and has an amazing historic clothing collection. Some of the clothing is on display throughout the house, but 90% of it in storage. Several years ago when my sister was a docent at the home, I had the opportunity to view the collection in person. The majority of the clothing dated from the late 1890s to early 1900s. Stupidly, I was only interested in Victorian era garments at that time and did not give these garments the attention I should have. Only now do I now realize the importance of these artifacts because the majority were donated by local families and thus all had a Southern connection. What an opportunity to document what real Southern American women were wearing at the turn of the 20th century! But I was younger then... and naive.

Early 20th century gown from their clothing collection

A few years later, I returned to the house- this time with my camera. I have to say, there is something amazing about this house. It is unlike any other museum or historically preserved house I have toured. It is very comfortable. It feels like home. 

Original grounds structure dating to the late 18th century

View of the yard looking toward the river

Main parlor
Attached Kitchen
What a treat in the American South!

19th century baby carriage
View from the back hallway looking into the dining room
View of the yard looking toward the river from the second floor
Second story doorway exiting out onto second story front porch

Mid 19th century wrapper/maternity gown

Second story nursery with hip tub

Boy's 2 piece dark blue velvet suit

Thursday, February 3, 2011

How to make your own laundry soap

Here at our household, along with an array of many other things, we make our own laundry soap. Why, you ask? Well, because we can. There are other factors like thriftiness and not having to rely on manufactured goods, etc. But primarily, we make our own laundry soap because we want to.

Here are the pros:
1. It's cheap.
2. It's extremely hypoallergenic.
3. It does not leave any stinky artificial perfumes on your clothing.
4. It does not use artificial dyes.
5. It does not pollute the environment.

Here are the Cons:
1. It does take time to make and special equipment (equipment should NOT be shared with equipment you intend to use for food).
2. It does not remove heavy stains.

So, if you think the pros outweigh the cons, here is the recipe and instructions:
1 bar of Fels Naptha soap, shaved (or you can use Zote soap instead of Fels)
4 cups of hot water to melt the soap
3 gallons of hot water
1 cup of borax
2 cups of washing soda
1 cup of baking soda
1 large pot about 4-5 gallons size 
Container(s) to hold soap (I use recycled milk jug style containers)

Grate the soap into the pot (not one you plan to cook with). You can use a box grater or just rough chop with a knife. Do not use whatever tool you use for grating soap with food.

Add 4 cups of hot water to the pan. Simmer on low until the soap melts completely into the water.

Add borax, washing soda and baking soda to the hot water. Simmer on low until it dissolves with the soap. If the mixture is not melting, add more water if needed.

Add 3 gallons of hot water. Mix with a large spoon until it completely dissolves (Again, do not use a spoon you intend to use for food).

Pour into containers. As the mixture begins to cool, it will turn into a thick gel. 

Use 1 cup of this homemade laundry detergent per load of laundry!

Because this laundry soap is perfume free, I sometimes add 1/2 cup of white vinegar to the rinse cycle to eliminate any stubborn odors. It does NOT make your clothes smell like a pickle, it DOES eliminate odors, and is a NATURAL fabric softener!
Let me know how it works out for you!